
INCUBATION GUIDE
Mastering Quail Incubation & Egg Yield: The Complete Guide
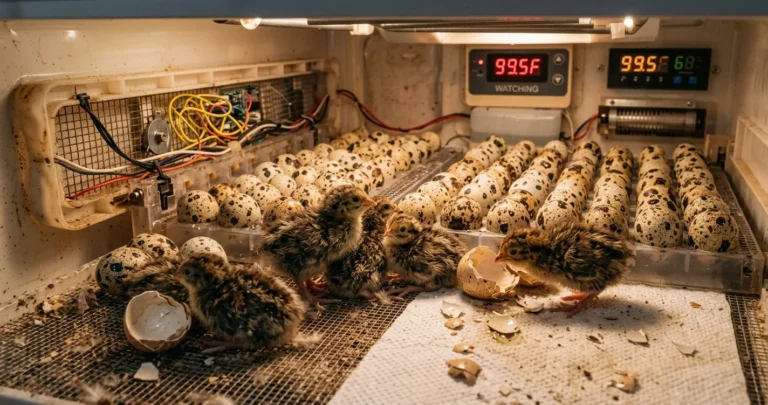
Temperature, humidity, turning and timelines for Coturnix, bobwhite and button quail, from setting day to a brooder full of chicks.
17–18 days
Coturnix hatch time
99.5°F
Forced-air temperature
50–85%
Typical hatch rate
65-70%
Lockdown Humidity
What Is Quail Egg Incubation and How Long Does the Process Take?
Quail egg incubation is the process of artificially warming and humidifying fertile quail eggs for roughly two to three weeks until they hatch, using a countertop incubator in place of a broody hen. The entire hatch cycle, from setting eggs to a brooder full of chicks, requires only a basic incubator, a thermometer-hygrometer, and a willingness to check on the eggs on a consistent schedule — there’s no specialized skill beyond following a schedule closely. This guide walks through that entire egg-to-chick cycle for the three species most home incubators raise — Coturnix quail (Japanese quail), bobwhite quail, and Button quail — because settings, timelines, and common mistakes differ meaningfully between them. Whether the goal is to grow a backyard covey, restock a hunting preserve, support a conservation project, or simply run a first hatch for the experience, the fundamentals below are the same repeatable skill used by breeders who run dozens of batches a year.
What actually separates a successful hatch from a disappointing one is rarely luck. It comes down to dialing in settings before eggs ever go into the machine, keeping the lid closed as much as possible, and resisting the urge to intervene once lockdown begins. This guide consolidates what tends to be scattered across forums, hatchery blogs, and conflicting incubator manuals into one first-hand, beginner-to-beginner reference, with specific numbers rather than vague ranges — target temperatures, humidity percentages by phase, and day-by-day timelines for each species — because vague advice is exactly what causes most failed hatches in the first place. Local backyard livestock ordinances occasionally restrict game bird keeping, so it is worth a quick check with a municipality before eggs are ever ordered.
Are Quail Eggs Hard to Incubate?
No — quail eggs are not hard to incubate, but they are less forgiving of temperature and humidity swings than chicken eggs, which is the main reason beginners perceive them as tricky. Anyone who has raised chickens will recognize most of the process immediately; the real difference is that quail embryos tolerate a narrower humidity band, so the margin for error shrinks even though the mechanics stay the same, and the single most important step — verifying your actual temperature and humidity before you ever load an egg — is a repeatable skill, not an innate talent.
Compared with incubating chicken eggs, quail incubation asks for tighter humidity management and closer attention during the final days, but it also rewards patience with a faster turnaround: most quail hatch in under three weeks, versus twenty-one days for chickens with a much longer path to point of lay afterwards. None of this requires expensive equipment — a basic countertop incubator, a reliable secondary thermometer, and a note-taking habit will get a first-time keeper through a respectable hatch on the very first attempt.
Which Quail Species Should You Choose for Incubation?
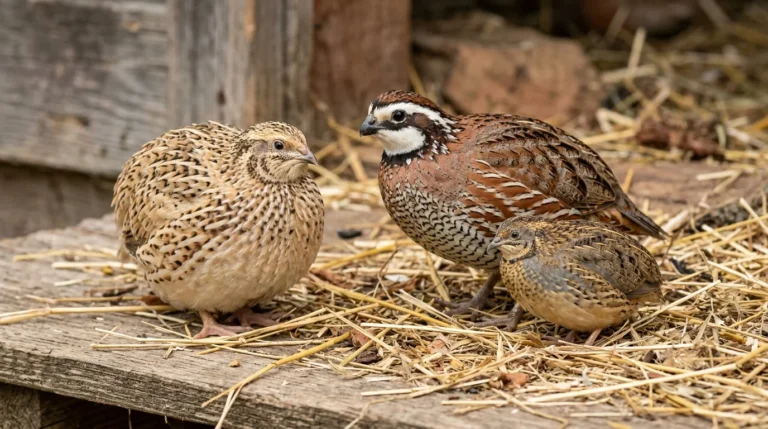
The right species depends on your goal: Coturnix quail incubation is the fastest and most forgiving choice for eggs and meat, bobwhite quail incubation suits conservation or hunting-preserve restocking but runs longer and may require permits, and Button quail work best as a novelty or pet-keeper project. All three are incubated using the same basic equipment and general workflow, but their temperature tolerances, incubation periods, and regulatory status differ enough that species selection should happen before any eggs are purchased or set.
| Trait | Coturnix (Japanese) | Bobwhite | Button Quail |
|---|---|---|---|
| Incubation period | 17–18 days | 23–24 days | 16–17 days (up to 22) |
| Forced-air temperature | 99.5°F | 99.5°F | 99.5°F |
| Incubation humidity | 45–50% | 40–45% | 45–50% |
| Lockdown day | Day 15–16 | Day 21 | Day 14–15 |
| Lockdown humidity | 65–80% | 65–70% | 65–70% |
| Adult weight | 5–8 oz | 6–7 oz | 1.4–1.8 oz |
| Regulatory status | Domesticated, no permit | Native bird — permits may apply | Domesticated, no permit |
Each species is broken out in more depth below, along with the most common beginner question about broodiness. For a deeper comparison of breeds, including laying rates, size and temperament, see our quail breeds guide.
Coturnix (Japanese) Quail
Coturnix coturnix japonica, commonly called Japanese quail, is the most domesticated and easiest-to-source species for coturnix quail incubation, and it hatches in 17–18 days under standard forced-air settings. It is hardy in captivity, climate tolerant, and available in a dozen-plus feather-color varieties, including the Celadon line that lays distinctive blue eggs from a recessive gene. A well-managed hen can lay close to 300 eggs a year with near year-round production and reaches point of lay by around 6 to 8 weeks — dramatically faster than the 5–6 months a chicken pullet needs. Jumbo Coturnix lines are bred specifically for larger egg and carcass size for jumbo coturnix quail hatching eggs buyers focused on meat production rather than laying rate, and both jumbo and standard lines use identical incubation settings.
Bobwhite Quail
Bobwhite quail (Colinus virginianus) is a ground-dwelling North American game bird ranging from the Great Plains to the Atlantic Coast and south toward Mexico, favoring open woodland, grassland, brushy fields, and agricultural edges — its call gives it the common “bob-WHITE” nickname. Northern bobwhite quail incubation runs 23–24 days, five to seven days longer than Coturnix, with a lockdown that begins on day 21 rather than day 15–16. Because bobwhite are a native, non-domesticated species in much of their range, keepers should check state gamebird regulations and local fish-and-wildlife department rules before sourcing eggs, since wild-collection restrictions and release permits can apply depending on jurisdiction and intended use — whether that use is backyard flock production, hunting-preserve restocking, or wildlife rehabilitation.
Button Quail & Other Species
Button quail are the smallest commonly kept domesticated quail, hatching in 16–17 days (occasionally stretching to 22 under cooler settings), and are typically raised for their novelty and pet-keeper appeal rather than meat or egg production. California quail, also called valley quail, are a separate wild North American species occasionally sourced as valley quail hatching eggs by aviculturists and wildlife rehabbers; they behave more like bobwhite in incubation needs than like Coturnix, and the same regulatory caution that applies to bobwhite generally applies here too.
Will Coturnix Quail Sit on Their Own Eggs?
Coturnix quail almost never sit on their own eggs, because generations of selective breeding for egg production have bred broodiness out of the species almost entirely. The maternal incubation instinct that lets chickens and many game birds sit a nest for weeks simply isn’t present in most commercial Coturnix lines, which is why artificial incubation is the standard — and often the only practical — method for hatching them at home. Some keepers work around this by using a broody bantam hen as a surrogate, since a bantam broody hen will readily sit quail eggs and raise the chicks once hatched, but this is a workaround rather than something to expect from the quail themselves.
Sourcing, Selecting & Storing Hatching Eggs
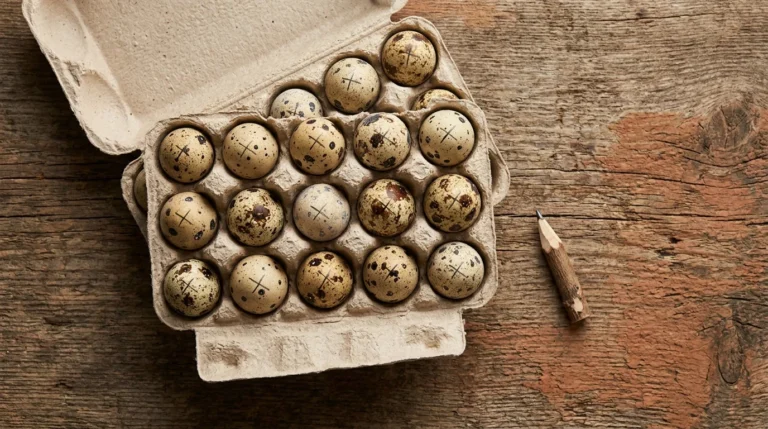
Hatching eggs quail can come from a local breeder, an interstate shipper, or your own laying flock, and each path has a different effect on hatch rate: self-collected eggs consistently outperform shipped eggs because they skip the jostling and pressure changes of transit entirely. Wherever the eggs come from, hatch success is decided well before the incubator is ever plugged in — by which eggs get selected, how long they sit before setting, and how they’re stored in the meantime. Getting this stage right is arguably as important as nailing temperature and humidity later on, since a cracked, dirty, or overly aged egg has no realistic chance regardless of how well the incubator performs.
Rising interest in backyard birds has made quail eggs and incubator starter kits far easier to find than they were even five years ago, whether through local marketplace listings, online breeder groups, or commercial hatcheries offering USPS Priority Mail egg shipping with foam-insert protection. That convenience comes with trade-offs worth planning around from the outset, which the sections below cover in the order a new batch of eggs typically moves through: sourcing, selection, aging, and storage.
Sourcing / Purchasing Fertile Eggs
Fertile quail eggs can be sourced from a local breeder for driving-distance pickup, from a shipping breeder with interstate certification, or pulled straight from your own flock if you already keep layers. Local pickup avoids the single biggest risk in the whole sourcing process — transit jostling — since eggs never leave the vehicle they’re carried in and never experience the pressure and temperature swings of a shipping network. When ordering from a supplier, it’s standard practice to order roughly double the number of chicks actually wanted, because shipped-egg hatch rates run meaningfully lower than local or self-collected rates; a dozen eggs is a reasonable beginner quantity that balances cost against the learning curve of a first hatch.
Collecting Your Own Fertile Eggs
Eggs collected from an existing flock carry a clear hatch-rate advantage because they arrive with known genetics, known health history, and zero shipping damage. A healthy breeding ratio is roughly one male per 4–6 females, which keeps the fertility ratio high without overworking the males; below that ratio, fertility often drops even when hens are laying normally. Self-collected eggs also remove the guesswork of supplier sourcing entirely, since the keeper already knows exactly how the flock has been managed, fed, and housed. Our quail farming guide covers male management and flock ratios in more detail.
Egg Selection Criteria
Good hatching eggs are clean, uniformly sized and shaped, and free of visible shell damage — reject anything dirty, misshapen, cracked, or unusually round or elongated, since odd shapes carry a higher developmental-failure rate and are genuinely harder for a chick to pip out of. Inspect each egg in bright light for hairline cracks, thin spots, or rough, large-pored texture, all of which are potential entry points for bacteria once the egg goes into a warm, humid incubator; a heavily soiled egg should simply be discarded rather than risking contamination of the whole batch. Eggs should never be washed before setting, since washing strips the protective bloom, or cuticle, that seals the shell’s pores against bacteria — light soiling can be dry-cleaned off with fine sandpaper instead. Once a batch passes inspection, mark each egg lightly in pencil (never ink or marker, which can seep through porous shell) with an X or O for turning reference, and always wash hands with antibacterial soap before handling eggs, since oils and germs can transfer through the shell’s pores to the embryo inside.
Egg Age at Setting
Hatching eggs hold their viability best when set within 5–7 days of collection, with fresher eggs consistently outperforming older ones; bobwhite eggs can tolerate a slightly longer 7–10 day hold. Hatch rates decline noticeably past the 10-day mark and eggs rarely hatch at all once they pass 14 days in storage, though anecdotal reports exist of eggs hatching after two weeks or more — these are the exception, not something to plan around. Mark the collection date on each egg or carton as it’s gathered, since it’s easy to lose track of age once several days’ worth of eggs accumulate in the same holding container.
Egg Storage Conditions
Store hatching eggs cool, out of direct sunlight, and without refrigeration — the ideal range is 8–12°C (45–55°F), well below the roughly 21°C (70°F) threshold at which embryonic development can begin prematurely inside an unset egg. Store eggs pointed side down so the air sac stays properly positioned in the large end, and reposition them several times a day (a propped carton works well for this) rather than leaving them static for the entire storage window. Before setting, bring stored eggs up to room temperature over about 24 hours — placing cold eggs directly into a warm incubator can cause shell condensation and an early temperature dip that stresses the embryo right at the start of development; pre-warming at 68–70°F for 4–6 hours accomplishes the same thing more gradually.
Can I Incubate Quail Eggs From the Store?
No — quail eggs bought from a grocery store cannot hatch, because they come from layer-only commercial flocks with no male present, meaning the eggs were never fertilized in the first place. This is a genuinely common beginner misconception, often fueled by an occasional “supermarket egg hatch anecdote” circulating online, but the explanation is straightforward: an unfertilized store egg has no embryo to begin with, so no amount of correct temperature or humidity will change the outcome. The distinction to keep in mind is egg fertility vs. freshness — a supermarket egg can be perfectly fresh and still be biologically incapable of hatching, since freshness and fertilization are entirely separate properties. If you simply want to eat or store quail eggs, see our guide to quail eggs.
What Hatch Rate Can You Expect From Quail Eggs?
Expect somewhere between 50% and 85% of set eggs to hatch, with the exact figure depending almost entirely on how the eggs were sourced: self-collected eggs typically land at 75–80%, locally sourced eggs land in a similar range, and long-distance shipped eggs often drop to around 50% because of transit stress. A well-run first hatch on shipped eggs that clears even 50% should be treated as a success rather than a disappointment, since an unfamiliar incubator and a first-time learning curve both work against the keeper regardless of egg quality. Some outliers exist in both directions — well-packaged shipped eggs occasionally clear 70%+, while a faulty or poorly calibrated incubator can drag even good eggs down to 15% or lower — which is exactly why benchmarking your own results against a spreadsheet or incubation log template matters more than chasing a single universal number.
Because so many variables feed into the final hatch percentage, most experienced keepers track an average clutch-to-hatch conversion rate across several batches rather than judging any single hatch in isolation. A hatch percentage benchmarking habit — even something as simple as a notebook line for each batch — turns a disappointing outlier into useful data instead of a mystery, and it’s the fastest way to isolate whether a low hatch was caused by the eggs, the incubator, or the keeper’s own process.
What Hatch Rate Should I Expect?
As a rule of thumb, budget for roughly 50% on shipped eggs from an unfamiliar incubator and 75–80% on self-collected or locally sourced eggs once the process is dialed in; treat 80% as a genuinely good-hatch benchmark rather than a baseline expectation. First-time keepers using a brand-new incubator should expect results toward the lower end of these ranges simply because both the equipment and the process are unfamiliar, and that gap tends to close quickly by the second or third batch.
What Reduces Hatch Rates?
The leading causes of a poor hatch rate are, in roughly descending order of impact: incorrect temperature or humidity during incubation, eggs that were too old or poorly fertile at setting, shipping damage from rough handling, and improper storage conditions before the eggs were ever set. Humidity errors cause the most damage of any single factor — too much humidity drowns chicks before hatch or produces chick deformities from a cramped air cell, while too little humidity at lockdown dries and tightens the membrane around a fully formed chick, trapping it inside the shell. Large, sudden temperature fluctuations compound these issues further, since embryos are far more sensitive to swings than to a small, steady offset from the ideal setting, and can cause premature hatching when spikes occur late in incubation.
What Equipment Do You Need to Incubate Quail Eggs?
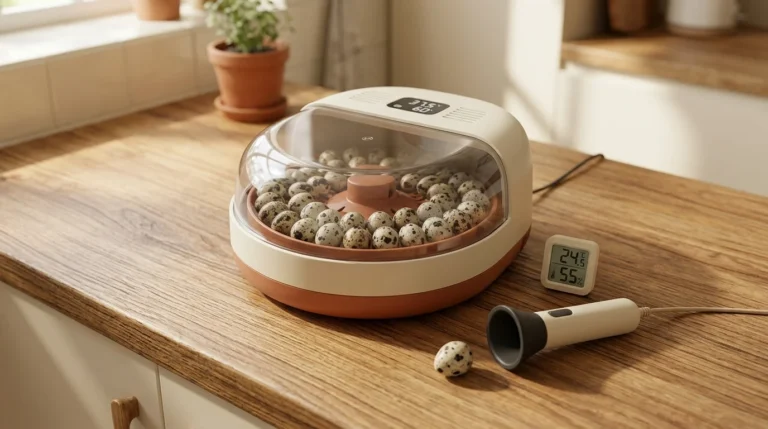
At minimum, incubating quail eggs requires an incubator, a secondary thermometer-hygrometer, and a water reservoir for humidity — a candler and a few pieces of hatch-day supporting gear round out a setup that will comfortably handle repeat batches. Entry-level tabletop units in the CT60 / CT120 / CT180 incubator tier, along with commercial models like the Brinsea Mini II Advance, Nurture Right 360, and GQF Hova-Bator, cover most home hatchers’ needs, while larger cabinet incubators offer multi-species hatching capacity for keepers running chicken, duck, or other eggs alongside quail. Capacity, in eggs per batch, and a digital versus analog control board are the two specs worth comparing most closely before buying, since a digital display removes much of the guesswork that analog dial-based units leave to interpretation.
Beyond the incubator itself, a handful of supporting tools make the difference between a stressful hatch and a smooth one: a reliable candler, hatch-day liner material, and a simple log for tracking settings and outcomes over time. The sections below break down each equipment category in the order it typically gets used, from the incubator itself through to the small supporting items that matter more than their size suggests.
Incubator Types — Forced Air vs Still Air
A forced air incubator uses a fan to circulate heat evenly throughout the chamber, while a still air incubator relies on passive heat rise from a bulb or heat lamp, which creates hot spots and requires a higher set temperature at egg level to compensate. Forced-air units are the better choice for first-timers because they hold temperature far more consistently, reducing the monitoring burden and the risk of hatch deformities from fluctuation; a still-air setup — including home-built or vivarium-conversion incubators using a 40W red heat lamp — can still produce solid hatches, but typically needs a working temperature closer to 102–103°F at egg level rather than the 99.5°F used in forced air. Quail-compatible auto-turning and accurate humidity control both come more easily with forced-air designs, which is part of why most commercial tabletop units default to that style.
Which Incubator Features Actually Matter?
The features worth prioritizing are automatic egg turning, a fully digital temperature and humidity readout, and an external water fill port that doesn’t require opening the lid to top off the reservoir. An automatic egg turner measurably improves hatch rate over hand-turning three or more times a day, mainly because it removes the human-error risk of a missed or inconsistent turn; vertical-position and side-lying turner styles both work for quail, with vertical trays offering some air-sac stabilization benefit for shipped eggs. Cheap plastic incubators without a circulation fan or adjustable vents tend to develop hot and cold spots and are more prone to mid-hatch motor failure, so it’s worth testing a new unit through a full 24–48 hour dry run before eggs ever go in — a step covered in more detail in the step-by-step process section below. Cabinet incubators with removable, quail-sized egg racks add real flexibility for keepers who also want to try multi-species hatching, and a humidity pump attachment can help units that otherwise struggle to hold humidity in a dry climate.
Do You Need a Secondary Thermometer & Hygrometer?
Yes — a second, independent thermometer and hygrometer inside the incubator is close to a must-do practice, because built-in sensors on many consumer units drift or read inaccurately over time. Uncalibrated sensors are responsible for a meaningful share of otherwise-unexplained hatch losses — estimates run as high as 15% — since an analog gauge can be off by 5–10 percentage points on humidity alone without any obvious sign something is wrong. Place the secondary thermometer-hygrometer at egg level rather than trusting a reading taken at the top of the incubator chamber, check it every 4–6 hours during the pre-run, and treat any large disagreement between the built-in display and the independent reading as a signal to trust the independent one and adjust settings accordingly, aiming for roughly ±0.5°F temperature stability and ±5% humidity stability once dialed in.
What Kind of Egg Candler Do You Need?

A basic egg candler — even a bright phone flashlight app held close to the shell in a dark room — is usually enough to monitor fertility and development and catch a rotten egg before it explodes inside the incubator. Purpose-built small-egg candler attachments with a focused, bright LED work better on dark, thick-shelled eggs that are difficult to read with an ordinary flashlight, though clean, white bobwhite shells candle easily with almost any light source. Plenty of experienced keepers skip candling altogether and still post successful hatches, but for anyone learning the process, candling remains the single best window into what’s actually happening inside the shell.
What Supporting Equipment Should You Have on Hand Before Hatch Day?
The short list of supporting equipment is a rubber shelf liner or grippy mat for chick traction, an observation notebook for a hatch log, and a pre-warmed brooder ready before the first pip appears. A textured surface under hatching chicks — a pre-cut rubber liner works well — prevents splay-leg, a leg-positioning injury that happens when newly hatched chicks slip on a smooth incubator floor. Keeping a simple hatch log or troubleshooting record, even a few lines per batch, pays off the first time a hatch underperforms and you need to trace back through set date, settings, and candling notes to figure out why.
What Are the Correct Incubation Settings — Temperature, Humidity & Turning?
The core settings for quail incubation are 99.5°F in a forced-air incubator (or roughly 101–103°F in still air), 45–50% humidity through the incubation phase, and a jump to 65–80% humidity at lockdown, combined with 3–5 daily turns until turning stops a few days before hatch. These three variables — temperature, humidity, and turning — account for the overwhelming majority of hatch failures when something goes wrong, which is why this settings table anchors the entire guide.
| Species | Incubation Temp (forced air) | Incubation Humidity | Lockdown Humidity | Turns/Day |
|---|---|---|---|---|
| Coturnix | 99.5°F | 45–50% | 65–80% | 3–5 |
| Bobwhite | 99.5°F | 40–45% | 65–70% | 3–4 |
| Button Quail | 99.5°F | 45–50% | 65–70% | 3–5 |
Small variations exist between practitioners and climates — a keeper in a humid Gulf-state climate manages humidity very differently from one in the arid Southwest — but the ranges above hold as a reliable starting point across almost every setup. The subsections below go deeper on each variable individually, plus the dry incubation method that some climates favor over active humidity management.
What Temperature Should Quail Eggs Be Incubated At?
Set a forced-air incubator to 99.5°F (37.5°C), or the still-air equivalent of roughly 101–103°F measured at egg level, and hold it there with minimal deviation from setting through lockdown. Verify the actual chamber temperature with a second, independent thermometer before ever loading eggs, since sustained error of even a degree or two shifts the expected hatch date and can reduce overall hatch rate; a pre-heat and 24–48 hour dry run in a draft-free room with even ambient temperature is the best way to confirm a unit is holding steady before eggs go in. Beginners sometimes work within a slightly wider 97–99.5°F range without disaster, since a small, steady offset is far less damaging than a large, sudden swing — but large spikes, especially late in incubation, can trigger premature hatching and should be corrected immediately.
What Humidity Should You Run During Incubation?
Run humidity at 40–50% for most of the incubation phase — 45–50% for Coturnix and Button quail, 40–45% for bobwhite — adjusting water volume or vent position as needed to hold that range. Humidity above roughly 55% during the main incubation phase is one of the leading causes of failed hatches, since excess moisture interferes with the normal evaporation an egg needs to develop a properly sized air cell; seasonal shifts matter here too, since winter heating tends to dry incubation rooms out while summer humidity can push levels too high without any change to the incubator’s own settings. A damp sponge in the water tray, an external humidifier, or simply adjusting an open vent are all standard ways to nudge humidity back into range without needing to buy specialized equipment.
What Humidity Should You Run at Lockdown?
At lockdown, raise humidity sharply to 65–80% (65–70% for bobwhite and Button quail) to protect the membrane and support a clean hatch. This jump is usually accomplished by filling a second water tray, adding a wet sponge or damp cloth, and opening the vents to 50–75% while the incubator remains otherwise sealed; the goal is a fast humidity boost without fully closing off oxygen exchange, since the fully formed chick inside needs to breathe through the shell membrane right up until it pips. Condensation forming visibly inside the incubator is a reliable sign that humidity has gone high enough — treat it as a “close enough” signal rather than chasing an exact percentage on the display.
How Often Should You Turn Quail Eggs?
Turn eggs at least three times a day, and ideally an odd number of times (3 or 5), from day 1 until turning stops two to four days before the expected hatch date. An odd number of daily turns ensures the egg spends alternating nights resting on a different side, which helps prevent the embryo from sticking to the shell membrane on one consistent side; an automatic turner handles this reliably, while hand-turning requires real consistency to match its benefit. Turning stops entirely at lockdown — day 15–16 for Coturnix, day 21 for bobwhite — so the chick can settle into hatching position without further disruption.
How Should Eggs Be Oriented in the Incubator?
Orient eggs with the pointed end down and the fat end up, whether in an upright rack or a side-lying, orientation-agnostic tray, since this positions the air cell correctly in the large end. Vertical turners hold this orientation automatically, while flat-rack side placement is orientation-agnostic by design and works equally well; at lockdown, eggs move onto their sides with the large end tilted slightly higher, which is the natural position a chick uses to orient itself toward the air cell as it prepares to internally pip.
What Is the Dry Incubation Method?
Dry incubation means running lower humidity (25–35%) through most of the incubation phase and raising it only at lockdown, and it’s the preferred approach in naturally drier US climates like the Southwest, Great Plains, or inland Southeast. The logic is straightforward: ambient room humidity in these regions is already low enough that adding extra water isn’t necessary and can actually push humidity too high, which is a far more common failure mode than running too dry. Keepers in humid coastal or Gulf-state climates should check their ambient humidity before assuming dry incubation applies to them, since the technique is climate-dependent rather than a universal recommendation.
What Do Common Quail Incubation Terms Mean?
Quail incubation has its own working vocabulary, and understanding a handful of core terms — internal pip, lockdown, candling, and zip among them — makes every other section of this guide easier to follow. Below is a scannable glossary covering the terms used throughout this article, arranged for quick reference rather than narrative reading.
• Internal pip — the moment a chick breaks through the internal membrane into the air sac and takes its first breath, before any hole is visible in the shell.
• External pip — the first visible hole or crack the chick makes through the actual shell, marking the start of the hatch becoming observable from outside.
• Zip — the circular cutting line a chick works around the shell’s large end after the external pip, effectively unzipping the top of the shell so it can push free.
• Lockdown — the final phase of incubation, beginning two to four days before the expected hatch date, when turning stops and humidity is raised sharply to protect the membrane.
• Candling — holding a bright light behind an egg in a darkened room to check for development, using the light passing through the shell to reveal blood vessels, a growing embryo, or a clear/infertile interior.
• Egg tooth — a small, hard point on the tip of a chick’s beak used specifically to pip and zip the shell; it falls off or wears away naturally within days of hatching.
• Quitter — an embryo that began developing but stopped at some point before hatching; identified during candling by a dark mass with no further growth between checks.
• Blood ring — a ring of blood visible when candling an egg where the embryo died very early in development, distinct from the spreading blood vessels of a healthy, developing embryo.
A quick
myth-busting note belongs here too: moon-phase folklore around hatch timing has
no basis in embryology — incubation length is governed by temperature and
species biology, not lunar cycles, and any apparent correlation is
coincidental.
How Do You Hatch Coturnix Quail Eggs Step by Step (17–18 Days)?
Quail incubation has its own working vocabulary, and understanding a handful of core terms — internal pip, lockdown, candling, and zip among them — makes every other section of this guide easier to follow. Below is a scannable glossary covering the terms used throughout this article, arranged for quick reference rather than narrative reading.
• Internal pip — the moment a chick breaks through the internal membrane into the air sac and takes its first breath, before any hole is visible in the shell.
• External pip — the first visible hole or crack the chick makes through the actual shell, marking the start of the hatch becoming observable from outside.
• Zip — the circular cutting line a chick works around the shell’s large end after the external pip, effectively unzipping the top of the shell so it can push free.
• Lockdown — the final phase of incubation, beginning two to four days before the expected hatch date, when turning stops and humidity is raised sharply to protect the membrane.
• Candling — holding a bright light behind an egg in a darkened room to check for development, using the light passing through the shell to reveal blood vessels, a growing embryo, or a clear/infertile interior.
• Egg tooth — a small, hard point on the tip of a chick’s beak used specifically to pip and zip the shell; it falls off or wears away naturally within days of hatching.
• Quitter — an embryo that began developing but stopped at some point before hatching; identified during candling by a dark mass with no further growth between checks.
• Blood ring — a ring of blood visible when candling an egg where the embryo died very early in development, distinct from the spreading blood vessels of a healthy, developing embryo.
A quick myth-busting note belongs here too: moon-phase folklore around hatch timing has no basis in embryology — incubation length is governed by temperature and species biology, not lunar cycles, and any apparent correlation is coincidental.
How Do You Hatch Coturnix Quail Eggs Step by Step (17–18 Days)?
Hatching Coturnix quail eggs follows a simple three-phase arc: pre-set preparation to verify your incubator, Day 1 setting once conditions are confirmed stable, and 13 days of active monitoring before candling and lockdown take over. Every day of incubation is counted from the moment eggs are actually set into the incubator — not from the date the egg was laid — since development only begins once the egg reaches incubation temperature. This section covers how to hatch quail eggs in an incubator from the very first pre-run through the start of active incubation; candling, lockdown, and hatch day each get their own dedicated sections further down since they apply across species.
Pre-Set Preparation
Before setting any eggs, run the incubator empty for 24–48 hours to confirm it holds steady temperature and humidity, since this dry run is the single best way to catch a thermostat problem before it costs you a batch. Remove any foam shipping material from purchased eggs, let shipped or stored eggs rest pointed-side-down for about 24 hours to let the air cell stabilize after transit, and discard any egg that arrives visibly cracked. Once the pre-run confirms stable readings and the eggs have finished their rest period, place the egg racks, thermometer-hygrometer, and a full water reservoir into position and bring stored eggs up to room temperature before loading.
Day 1 — Setting the Eggs
Set eggs once the incubator has reached target temperature and humidity and the eggs themselves have completed their 24-hour rest — place them gently in the rack using the orientation appropriate to your incubator model, and start turning immediately if you’re not using an auto-turner. Log the set date and the expected hatch date right away, since this becomes the reference point for every candling check and lockdown decision that follows; there’s no detectable development yet on day 1, so simply close the lid and let the incubator do its work.
Days 2–14 — Active Incubation
Through days 2–14, the routine is straightforward monitoring: check the secondary thermometer-hygrometer readings, top up the water tray as needed, and keep the lid closed except for turning or humidity adjustments. Hold 37.5°C/99.5°F and 45–50% humidity throughout this window, making only small, gradual adjustments rather than large corrections if a reading drifts; day 7 opens the window for a first candling check to confirm embryo development, covered in full in the candling section below. Minimizing lid openings matters more than it might seem — every open-and-close cycle drops both temperature and humidity temporarily, so a quick, deliberate check beats a slow, curious one every time.
Day-by-Day Bobwhite Quail Incubation Timeline (23–24 Days)
Bobwhite quail take 23–24 days to hatch, five to seven days longer than Coturnix, and the extra length is best understood as four distinct phases: setting and early development (days 1–6), candling and mid-incubation (days 7–14), the final active week and lockdown (days 15–21), and pip through hatch (days 22–26). Breaking the timeline into these phases makes a fairly long incubation period much easier to track day to day.
Days 1–6 — Setting & Early Development
Day 1 is the setting day: pre-warm eggs for 4–6 hours, confirm 24-hour incubator stability before loading, mark eggs with the X/O system for turning reference, and log both the set date and the projected hatch date. Days 2–6 are quiet from an observation standpoint — there’s no visible development yet under a candler — so the routine is simply a daily water-reservoir check, verification that the auto-turner is cycling correctly, and turning at regular intervals if turning by hand, while avoiding unnecessary lid openings.
Days 7–14 — Candling & Mid-Incubation
Day 7 marks the first useful candling window: work in a darkened room with a bright LED candler and expect to see a spiderweb of red blood vessels around a dark central mass in a fertile, developing egg, versus a clear interior with only a yolk shadow in a clear or infertile egg, or a blood ring where development started and stopped early. Remove clears and blood-ring eggs immediately to prevent bacterial contamination of the rest of the batch, and keep each candling session under 5–7 minutes before returning eggs to the incubator. Days 8–13 bring rising oxygen consumption and increased evaporation as the embryo grows, so ventilation ports may need to open slightly and humidity should be watched for the gradual drift that comes with week-two metabolic activity — correct gradually rather than with a sudden swing. A second candling around day 14 should show a large dark mass and a clearly visible air cell; an air cell under about 25% of the egg’s volume signals humidity has been running too high, while one over 40% signals it’s been too low, and either calls for a 3–5 point adjustment.
Days 15–21 — Final Week & Lockdown
Days 15–20 are the final active week: no further candling is needed, the embryo is now fully formed, and vents should sit 25–50% open to support rising oxygen exchange, with settings otherwise left unchanged. Use this window to pre-warm the hatch tray and brooder — the brooder should already be holding 95–98°F by the time hatch day arrives. Day 21 is lockdown: stop all turning, transfer eggs onto their sides in the hatching tray, raise humidity to 65–70% using a damp sponge, open vents to 75%+, and do not reopen the incubator until hatching is fully complete — a sharp humidity drop at this stage dries and tightens the membrane, which is the single most common cause of chicks trapped inside a nearly finished shell.
Days 22–26 — Pip, Zip, Hatch & Post-Hatch Transfer
The first external pips typically appear on days 22–23, with 12–24 hours passing between pip and the chick fully emerging; resist the temptation to assist a short pip, since the standard guidance is to wait a full 24 hours of no progress before considering intervention, given the real bleeding risk from an unabsorbed yolk sac if help comes too early. Once a chick is fully dry and fluffy — typically 12–24 hours after hatching — transfer it to a pre-warmed brooder; chicks still wet should stay in the incubator, and the safest approach is to wait until hatching has fully stopped before doing a single batch removal rather than opening the incubator repeatedly. In the brooder, offer a shallow water dish fitted with marbles to prevent drowning, and a fine starter crumble on a paper towel for the first couple of days — our quail feed guide covers exactly what to feed hatchlings. Day 25 is the typical post-hatch transfer point for the main batch, with day 26 serving as a reasonable cutoff for stragglers before the incubator is cleaned and sanitized with a poultry-safe disinfectant ahead of its next use
How Do You Candle Quail Eggs — When, How & What Should You See?
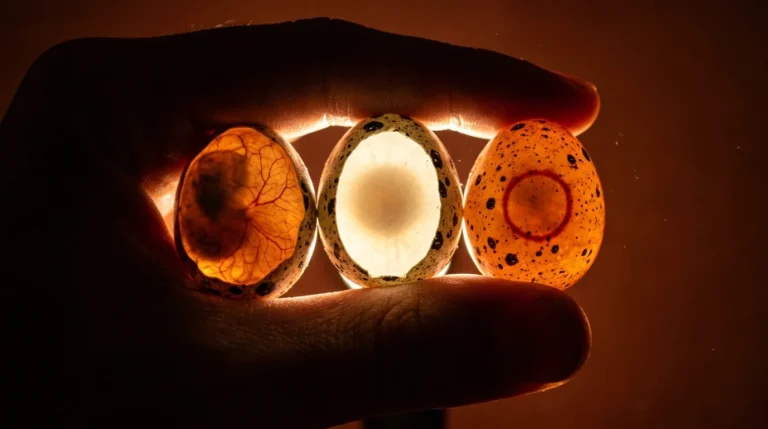
Candling means holding a bright light behind an egg in a dark room to check fertility and development, and it’s typically done around day 7 and again around day 14, using a quail egg candling chart-style comparison of what fertile, infertile, and stalled eggs each look like under the light. It’s an optional step — plenty of keepers skip it entirely and still post good hatches — but for anyone learning the process, candling is the clearest window into what’s actually happening inside the shell before hatch day arrives.
When Should You Candle Quail Eggs?
Candle around day 7 for a first fertility check, and again around day 14 for an air-cell and development check, but avoid candling before day 7 (nothing useful is visible yet) and stop entirely after day 21 lockdown begins. A pre-incubation crack check under bright light is worth doing before eggs ever go in, separate from the developmental candling schedule; some keepers also do a final lockdown-day candle to catch any expired embryos before the humidity jump, though this is optional on top of the standard two-check schedule.
What Should You See When Candling Quail Eggs?
A fertile, developing egg shows a spiderweb of red blood vessels spreading out from a dark central mass, while a clear egg with only a visible yolk shadow and no vascular pattern is infertile or died very early. A ring of blood with no further embryo structure signals a quitter — development that started and then stopped — and any of these non-developing eggs should be removed promptly to prevent contamination risk to the rest of the batch. By the second candling around day 14, a healthy egg shows a large dark mass filling most of the shell with a clearly defined air cell at the large end; that air cell’s size doubles as a humidity diagnostic, since one under roughly 25% of egg volume means humidity has run too high, while one over 40% means it’s run too low, and either calls for a modest 3–5 point correction.
What's the Right Candling Technique?
Work quickly and gently — keep each egg out of the incubator for well under five minutes, handle it over a soft surface to avoid drops, and keep the incubator lid closed the whole time you’re candling so the remaining eggs don’t lose warmth. Mark any egg you’re genuinely uncertain about with a light question-mark rather than discarding it outright, and recheck it in two to three days rather than making a premature call; dark, thick-shelled eggs are genuinely harder to read than pale ones, and a dedicated bright LED candler often outperforms an ordinary flashlight on these, though a phone’s torch app held close in a dark room is an adequate substitute for most keepers.
How to Tell if a Quail Egg Is Fertile?
Candling is the only reliable way to tell if a quail egg is fertile — there is no accurate way to judge fertility from the outside of the shell before candling. A spiderweb-like pattern of red blood vessels around a dark center indicates a fertile, developing egg, while a clear interior with just a yolk shadow means the egg is infertile or died at a very early stage; external shell appearance, color, or shape give no reliable clue either way.
Can You Eat a Fertile Quail Egg?
Yes — a fertile quail egg is safe to eat and tastes identical to an unfertilized one, as long as it has been kept refrigerated and never actually placed in an incubator. Fertility and food safety are separate questions entirely: a fertile egg simply contains the genetic potential to develop if incubated, but sitting in a refrigerator it behaves exactly like any other egg. The exception is an egg that was incubated and then abandoned partway through development — that should be discarded rather than eaten, and a strong off odour is a reliable warning sign if there’s ever doubt. Culturally, this distinction is most visible in dishes like balut, a partially developed fertilized egg eaten in parts of Southeast Asia, which underscores that fertilized eggs are edible at various stages — it’s abandonment mid-development combined with spoilage, not fertility itself, that makes an egg unsafe. For storage, safety and cooking tips, see our guide to quail eggs.
What Happens During Lockdown?
Lockdown is the final two to four days of incubation when turning stops, humidity jumps sharply, and the incubator stays sealed until hatching is complete — and it is widely considered the most critical and most commonly mismanaged phase of the entire process. Because lockdown timing and humidity handling differ meaningfully between Coturnix and bobwhite, and because opening the incubator at the wrong moment during this window can undo weeks of otherwise careful management, it deserves its own dedicated section rather than being folded into either species timeline.
When and How Does Coturnix Lockdown Work?
Coturnix lockdown begins on day 15 or 16 (practice varies slightly by keeper): remove the eggs from the turning tray, take out the turner itself, and give the eggs a brief rest in an egg carton during the changeover. Fit a rubber shelf liner or other grippy mat onto the incubator floor to give hatching chicks traction and prevent splay-leg, lay the eggs flat rather than upright, and raise humidity to 65–80% using a wet sponge or damp cloth in the water tray, maintaining 37.5°C/99.5°F throughout. From this point forward, the incubator should not be reopened until hatching is fully complete — every reopening lets humidity escape rapidly, and the resulting dry-air inrush can shrink-wrap a nearly finished chick inside its own membrane.
When and How Does Bobwhite Lockdown Work?
Bobwhite lockdown begins on day 21, roughly 2–3 days before the expected hatch date: lay eggs on their sides, raise humidity to 65–70%, open the vents, and then seal the incubator and leave it closed through hatching. Because the membrane can dry within minutes if the incubator is opened, removing early-hatched chicks too soon is a common and costly mistake — chicks that hatch first generally have sufficient yolk reserves to tolerate an extra 24 hours inside while their sibling eggs finish hatching.
Why Is Lockdown the Most Critical Phase?
Lockdown determines the final hatch rate more than any other single window in the process, because a two-to-four-day period of stable, undisturbed humidity is exactly what a fully formed chick needs to pip, zip, and emerge without complications. Keeper preferences vary on exact timing and humidity targets within the ranges given above, but the core discipline is universal: resist the urge to open the incubator to check on progress, since every open-and-close cycle during this narrow window works directly against the chick’s chances.
What Happens on Quail Hatch Day?
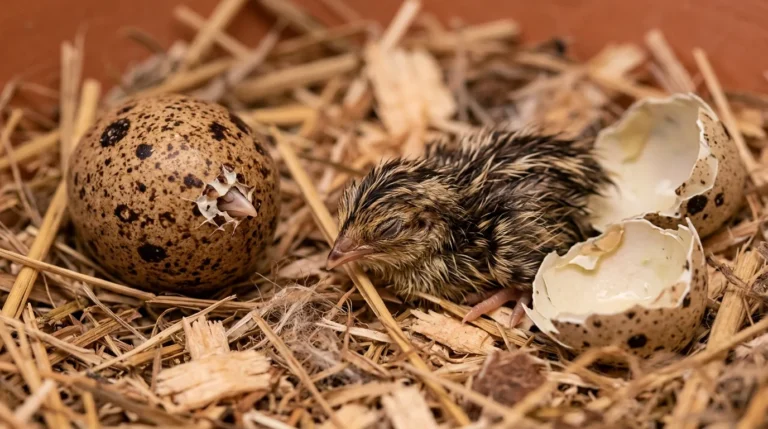
Hatch day typically arrives on day 17 or 18 for Coturnix and day 23 or 24 for bobwhite, unfolding as a sequence of internal pip, external pip, zip, and emergence that can take up to 24 hours from the first visible crack to a fully hatched chick. The instinct to help is strong, but the right approach on hatch day is almost always to observe rather than intervene — this section covers what’s actually happening at each stage, what’s normal, and the rare cases where assistance is genuinely warranted.
What Happens During the Pipping & Zipping Sequence?
Internal pip — the chick breaking into the air sac and taking its first breath — comes first, followed by chirping and calling audible from inside the shell, then the external pip that creates the first visible hole. After the external pip, chicks typically rest for 12 or more hours before the next crack, alternating brief bursts of tapping with longer periods of stillness while recovering oxygen; this pattern is completely normal and not a sign of trouble. The chick then zips — cutting a circular line around the shell’s large end — and works its way free, a process that can take anywhere from a few hours up to a full 24 hours from first pip to full emergence. Keep the incubator closed throughout, since wet, exhausted chicks are highly vulnerable to chilling if exposed to a temperature drop right after hatching, and hatching across a single batch typically spreads over one to two days, with most Coturnix chicks out by day 18 (stragglers on day 19) and most bobwhite chicks out by day 24 (stragglers to day 25).
What Day Do Quail Eggs Start Pipping?
Coturnix typically show internal pip activity around day 16–17, with external pipping following shortly after; bobwhite external pip usually starts on day 22–23; and Button quail pip around day 15–16. These figures line up with each species’ overall incubation length, since pipping always begins in roughly the final one to two days before full emergence regardless of species.
What Is the Anatomy of Hatching?
The egg tooth — a small, hard point at the tip of a chick’s beak — is the tool it uses to both internally and externally pip the shell; it either breaks off or gradually wears away within days after hatching, since it serves no further purpose once the chick is free. Specialized neck tendons let the chick’s neck tuck up under its own wing during the final stretch of incubation, positioning its head correctly to stretch and peck its way around the zip line as it works to free itself.
Should You Help a Chick That Is Struggling to Hatch?
In almost every case, no — let the chick hatch unassisted, because the physical effort of pipping and zipping builds the leg and hip strength a chick needs immediately after hatching, and premature assistance carries real risk of hip issues or even death. A chick with a short pip and no visible progress should generally be given a full 24 hours before any intervention is considered, since a resting period after the exhausting internal pip stage is completely normal. If a full 24 hours passes with genuinely zero progress, the narrow exception for careful assistance involves gently moistening the membrane with a warm-water cotton swab rather than pulling shell pieces away, followed by a further two-hour reassessment window — pulling at the shell risks tearing blood vessels still feeding an unabsorbed yolk sac, which can cause fatal bleeding.
How Do You Set Up a Brooder and Care for Chicks After the Hatch?
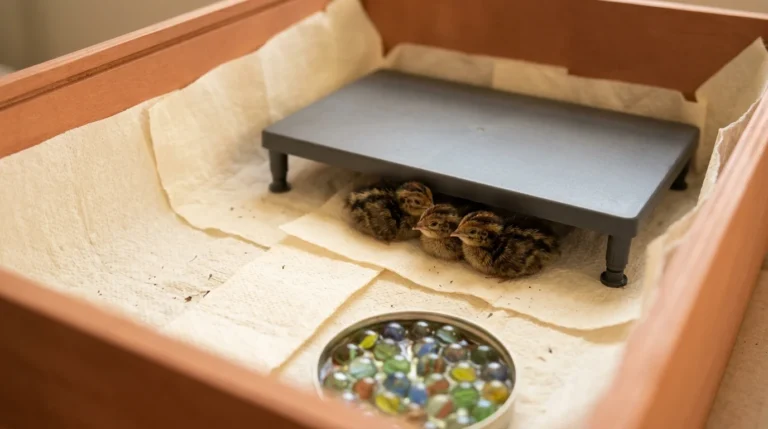
A quail brooder needs to hold 95–98°F for the first week, then step down about 5°F per week, along with leg-safe bedding, a drowning-proof waterer, and predator-proof cover, since newly hatched quail are precocial and mobile almost immediately but still extremely vulnerable to chilling and drowning. Getting the brooder ready before hatch day, rather than scrambling once chicks arrive, avoids the single most common cause of early chick losses: a cold, unprepared brooder receiving wet, exhausted hatchlings straight out of the incubator.
How Should You Set Up the Brooder Before Hatch Day?
Have the brooder running at 95–98°F before the first chick is transferred, using a heat lamp or a radiant heat plate (a plate is generally safer for unattended overnight use). Line the floor with paper towels for the first week to prevent leg-splaying on a slick surface, add a shallow waterer fitted with marbles or pebbles so chicks can’t slip in and drown, and budget about 0.5 square feet per chick for weeks 1–2, rising to 1 square foot per chick from week 3. Always use a secure, hardware-cloth brooder cover, since quail chicks can jump 4–6 inches vertically by day 5 and manage short flights by day 7–10 — an open-top brooder is simply not adequate. Our quail care guide has the full week-by-week brooder schedule and early chick health checks.
How Long Can a Newly Hatched Chick Go Without Food?
Estimates vary: some sources cite a 2–3 day yolk reserve, while others cite a tighter 24–48 hour window before a chick needs to start eating and drinking. In practice, this discrepancy matters less than it seems — a newly hatched chick simply doesn’t need immediate feed the moment it hatches, and the safe, practical approach is to have food and water available and accessible within the first 24 hours after transfer to the brooder, comfortably inside either estimate. For what to feed once they start eating, see our quail feed guide.
When Can Chicks Move Outside?
Chicks can typically move outside once they are fully feathered and night temperatures hold above 60°F — usually between 4 and 6 weeks, earlier in warm southern states and later in northern climates where nights stay cool well into the season. Move them into a draft-free outdoor pen gradually rather than all at once. Our quail housing guide covers coop size, ventilation and predator-proofing for that transition.
Why Do Quail Hatches Fail, and How Do You Fix It?
Most failed quail hatches trace back to one of four causes: incorrect humidity, infertile eggs from a poorly managed breeding flock, incorrect temperature, or losses that happen in the brooder rather than the incubator. A hatch rate below 50% is a signal to work through these systematically rather than assume the eggs themselves were simply bad — in most cases, a specific, correctable variable is behind the disappointing result.
The subsections below work through each major failure category in turn, starting with the single most common mistake beginners make.
What Are the Most Common Mistakes in Quail Egg Incubation?
The most common mistakes are: mismanaging humidity (the single leading cause of failure), opening the incubator too frequently, skipping a second thermometer/hygrometer and trusting an uncalibrated built-in sensor, setting eggs that are already older than 10–14 days, getting lockdown timing wrong, unnecessarily assisting a hatching chick, and forgetting to stop turning at lockdown or ignoring the odd-number turning rule. Nearly every one of these mistakes is fully preventable with the specific settings and schedules covered earlier in this guide — they tend to recur precisely because they’re easy to overlook rather than because they’re hard to fix.
What Causes Infertility & Breeding Flock Issues?
If every egg in a batch comes back clear at the day-7 candling check, the eggs themselves were likely infertile rather than the incubation process being at fault. Common causes include a wrong male-to-female ratio (aim for roughly 1 male per 4–6 females), a male that’s too young to breed effectively (16–20 weeks is a reasonable minimum age), or a breeding flock nutritional deficiency — increasing breeder protein and adding Vitamin E supplementation ahead of the next breeding cycle are standard corrections. Our quail feed guide covers breeder diets in detail.
What Causes Humidity-Related Hatch Failures?
Humidity failures show up as two opposite problems: fully formed chicks unable to exit a shell with a dried, tightened membrane (low lockdown humidity), or drowned or malformed chicks from excess moisture during the main incubation phase (humidity consistently above 50% for days 1–14). The fix in each case is to correct toward the target range with an independent, calibrated hygrometer rather than trusting a factory gauge — raise lockdown humidity to 65–70% if chicks are struggling to exit, or reduce incubation-phase humidity to roughly 40–43% and increase vent opening if condensation or an undersized air cell points to excess moisture; dry incubation is worth considering specifically in already-humid climates.
What Causes Temperature-Related Hatch Failures?
Temperature spikes or crashes in the first three days of incubation are especially damaging, since early embryonic development is highly sensitive to instability at exactly the point when it’s just getting started. Rough handling during setup, skipping the pre-run stability check, and excess heat late in incubation (which can trigger premature hatching and visible chick deformities) round out the main temperature-related failure modes — all of which point back to the same fix: verify stability before setting eggs and avoid large, sudden setting changes afterward.
What Causes Losses in the Brooder After Hatch?
Most post-hatch losses happen in the first 72 hours and trace back to chilling during transfer, drowning in a deep waterer, or pasting up — a condition where droppings stick to a chick’s vent and block it — all of which are preventable with correct brooder temperature (verified at 95–98°F before transfer), shallow water with marbles, and daily checks. Separately, cracked eggs discovered before setting, blood rings found at day-7 candling, or eggs that were viable but simply stored too long all point back to earlier stages in the process rather than the brooder itself — running a deliberate test cycle before the next hatch, with tighter attention to the specific variable that failed, is the most reliable way to improve results next time. Our quail care guide covers pasting up and other early chick problems.
Frequently Asked Questions - Hatching & Chick Care
How Long Do Quail Eggs Take to Hatch?
It depends on species: Coturnix take approximately 17–18 days (occasionally stretching to 21–22), Button quail take 16–17 days (up to 22 in some cases), and bobwhite take 23–24 days with stragglers occasionally emerging as late as day 25. Some variance between sources exists for every species, largely reflecting differences in exact temperature settings and individual flock genetics rather than any error in the ranges themselves.
How Does Bobwhite Incubation Compare With Coturnix and Chickens?
Bobwhite quail take 23–24 days, roughly five to seven days longer than Coturnix’s 17–18 days and three to four days longer than a chicken egg’s standard 21-day incubation period. This cross-species comparison is a useful sanity check for anyone incubating multiple species side by side, since it explains why bobwhite and chicken eggs set on the same day won’t hatch together even though their settings look broadly similar.
Can You Count Incubation Days From When the Egg Was Laid?
No — count incubation days from the moment the egg is actually set into the incubator, not from its lay date, since embryonic development doesn’t begin until the egg reaches incubation temperature. Counting from the lay date instead is a common day-count error that throws off candling and lockdown timing for the entire batch.
How Long Can Quail Eggs Sit Out Before Incubation?
Quail eggs can tolerate room temperature for up to roughly a week without major viability loss, but proper cool storage (8–12°C / 45–55°F) is always preferable to simply leaving eggs sitting out at uncontrolled room temperature, since viability declines steadily the longer eggs sit outside a controlled environment — see the full storage guidance in the sourcing section above for specifics on positioning and repositioning.
Why Has Your Chick Stopped Moving After Pipping?
This is almost always a normal resting period rather than a problem — chicks take in oxygen and recover from the exertion of pipping, and it’s completely typical for 12 or more hours to pass before the next visible crack. Patience is the right response here, not intervention.
How Long Do Chicks Stay in the Incubator After Hatching?
Leave chicks in the incubator for 12–24 hours after hatching until they’re fully dry and fluffy, then remove them roughly 24 hours after the first chick hatched, doing a single batch removal rather than opening the incubator repeatedly. Wet chicks should always stay inside a little longer, and it’s best to wait until all hatching activity has fully stopped before opening the lid, since this also prevents chilling any chicks still mid-hatch.
Why Are Your Eggs Not Hatching at All?
Work through a systematic variable check: humidity above 50% during incubation can drown chicks or cause late embryo death, humidity below 60% at lockdown dries the membrane and traps chicks inside, opening the incubator during active hatching disrupts the humidity other eggs need, eggs older than 10 days may simply have been non-viable from the start, and temperature inaccuracy from relying on a factory gauge alone is a frequent hidden culprit. Infertile eggs from a poorly managed breeding flock round out the list — if every egg came back clear at candling, the issue likely started well before the incubator was ever involved.
What Do You Do With the Incubator After the Hatch?
Turn it off and let it cool, then give it a thorough cleaning following the manufacturer’s directions, sanitizing promptly with a poultry-safe disinfectant. Let it dry fully before storing it until the next hatch — this step matters for biosecurity between hatches, since residue left behind from one batch can carry bacteria into the next.
Homestead Quail
Practical, question-first guides for raising healthy,
productive quail —from first egg to full coop.
TOPICS
Farming
Breeds
Care
Feed
MORE
Housing
Incubation
Eggs
SITE
About
Contact
Privacy Policy
© 2026 Homestead Quail. All rights reserved.